
Redirect & Lightbox
Redirect your customer's payments to our payment pages and shift any developments related to third-party providers to our gateway. We take care of all the necessary redirects. After a transaction has been completed we redirect your customer to your defined success, cancel, or error URL. We also inform your webhook with all necessary information from the transaction, including the saved card information. Besides a full redirect, you can use the Lightbox integration to show our payment pages as an overlay on your website.
Avoid embedding our Redirect or Lightbox integration in an iframeTo avoid issues with our payment forms, avoid embedding them via an iFrame. By embedding the Redirect or Lightbox integration in an iframe, you may break some payment flows.
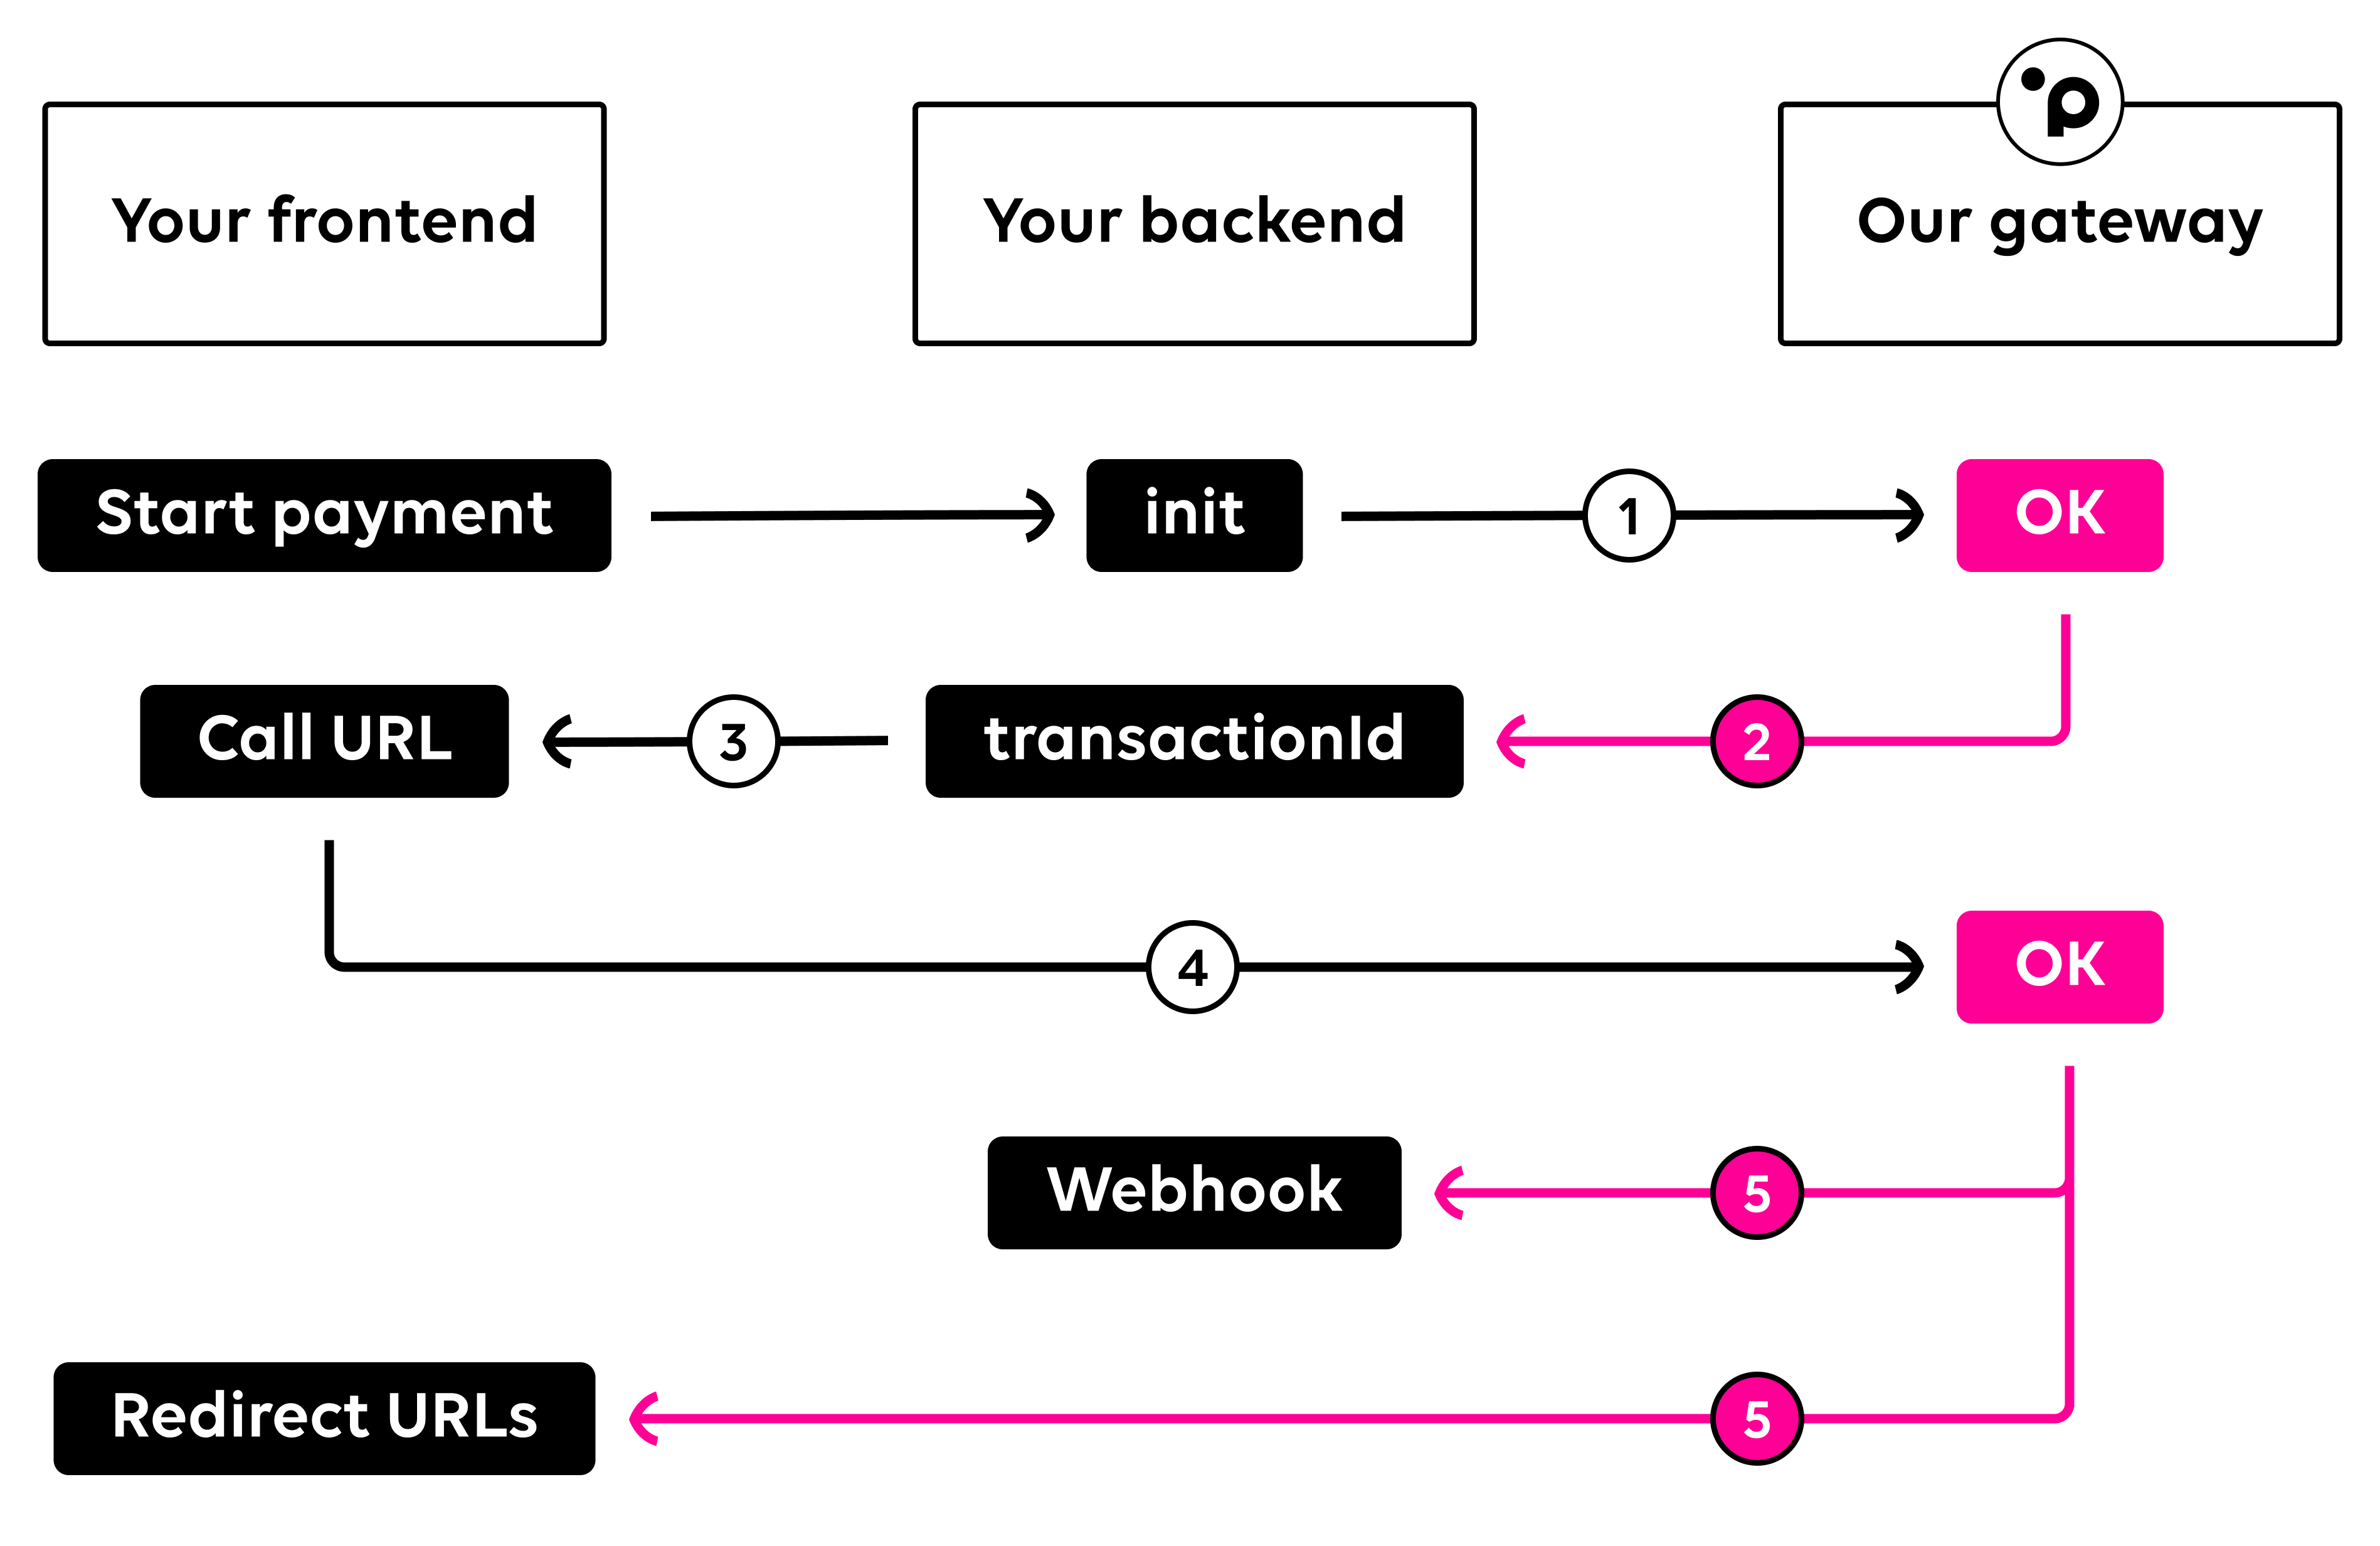
Process overview
To start a transaction via our Redirect or Lightbox Integration, you will need to call our init endpoint ¹ to receive a transactionId ². For any new operation you should retrieve a new transactionId. A transactionId is valid for 30 minutes. The transactionId can now be sent to your frontend and used to call our payment pages ³. Once your customer completes the transaction ⁴ we will return the transaction information to your defined webhook and redirect the user to the specified redirect URLs ⁵.
Initializing transactions
To use either the Redirect or Lightbox integration, you will need to initialize a transaction via a server-to-server call first. Call our init endpoint with your desired parameters and we'll return a transactionId ready to be used with our Redirect or Lightbox. Please note that a transactionId is only valid for 30 minutes.
curl 'https://api.sandbox.datatrans.com/v1/transactions' \
-H 'Authorization: Basic {basicAuth}' \
-H 'Content-Type: application/json' \
-d '{
	"currency": "CHF",
	"refno": "Test-1234",
	"amount": 1000,
	"paymentMethods": ["ECA"]
}'
Redirect integration
Redirect your customers to our payment pages by adding the returned transactionId to the redirect URL. The complete redirect link is also returned in the response header Location. We'll take care of the rest.
https://pay.sandbox.datatrans.com/v1/start/{transactionId}Lightbox integration
The Lightbox displays an iframe on top of your UI. To use the Lightbox, you will have to load our JavaScript library and call the startPayment function with the transactionId. Please note that when a mobile device is detected, our Lightbox automatically switches to full redirect mode (Redirect integration).
<script src="https://pay.sandbox.datatrans.com/upp/payment/js/datatrans-2.0.0.js"></script>There are 4 optional callbacks you can invoke with our lightbox integration.
opened|function(): Triggered when the payment form is opened.loaded|function(): Triggered when the payment form is loaded.closed|function(): Triggered when the payment form is closed.error|function(errorData): Triggered if an error occurred during the initial request.errorData.messagecontains the actual error message.errorData.detailcontains the details of the error. If no details are available,nullwill be returned.
errorData is not related to the authorization statusPlease note that this callback is only triggered if the initial request to Datatrans resulted in an error. This is the case if you sent invalid parameters, such as an invalid
merchantId. This callback is not triggered if the authorization resulted in an error.
payButton.onclick = function() {
  Datatrans.startPayment({
    transactionId:  "{transactionId}",
    'opened': function() {console.log('payment-form opened');},
    'loaded': function() {console.log('payment-form loaded');},
    'closed': function() {console.log('payment-page closed');},
    'error': function() {console.log('error');}
  });
};
Selection of payment methods
Our solutions let you choose whether you want to do the payment method selection on your UI or on our payment forms. By default, we display all available payment methods in your merchant's configuration. If you do the preselection on your end, simply send the array paymentMethods including only one payment method to redirect to the final payment screen of that specific payment method. If you wish to have multiple payment methods on our payment pages, you can simply extend the array with further payment methods.
"paymentMethods": ["ECA","VIS","PAP","TWI"]Auto settlements
Settle your transactions automatically or in two steps with the parameter autoSettle during your init calls. If you do not specify anything in your init request, your transactions will not be settled automatically. Please refer to the section settling a transaction for more information on deferred settlements and the related server to server request.
"autoSettle": trueSaving payment information
Save card or payment method details after your customer has finalized their payment or registration. Not all payment methods support a registration with a payment. Please refer to our tokenization overview to see which payment methods require a dedicated registration. Please also read our section saving payment information for more details. Payment methods that do not support tokenization will be automatically omitted. The registered token and further relevant information will be returned in our webhook and can be additionally retrieved by checking the status of a transaction.
"amount": 1000,	// Omit the parameter amount for dedicated registrations
"option": {
	"createAlias": true	// Required to save a card (not needed for dedicated registrations)
}
Fast checkouts
Fast checkouts or one-click checkouts can also be displayed in our redirect and lightbox. If you include the object card with alias set in your payload, we will prefill the card number and the expiry date on our payment pages for you. This is useful for payments where you want customers to complete their payments as you speed up the payment experience. Only one payment method should be included in the array paymentMethods to load the last screen of our redirect or lightbox integration immediately.
"card": {
	"alias": "{cardAlias}",
	"expiryMonth": "12",
	"expiryYear": "25"
},
"paymentMethods": ["VIS"]
Redirect settings
For each of your transactions, you can tell us where we should redirect your customers in case of a success, a cancel, or an error. We have three parameters you can define for this. The successUrl, cancelUrl, and errorUrl can be set in the object redirect. You can also define the HTTP method for the redirect. When using GET as a method, the parameter datatransTrxId will be added to the URL upon redirection. When using POST, all parameters will be moved to the body of the redirect request along with the parameter datatransTrxId.
"redirect": {
	"successUrl": "{successUrl}",
	"cancelUrl": "{cancelUrl}",
	"errorUrl": "{errorUrl}",
	"method": "GET"
}
Mandatory 3DS Data
We require various data fields for 3DS authentication processing. Your init requests must include valid consumer data, including the cardholder's name, email, and phone number. For more information, please refer to the 3DS mandatory data overview.
{
  ...
  "card": {
    "3D": {
      "cardholder" : {
        "cardholderName": "John Doe",
        "email": "[email protected]",
        "homePhone": {
          "cc": "41",
          "subscriber": "791234567"
        }
      }
    }
  }
}
Currency Conversion
The Redirect & Lightbox integrations support dynamic currency conversion (DCC) and multi-currency pricing (MCP) of our Currency Conversion offering. For DCC, you will not need to make any integration changes; it will be a simple change by us in your merchant configuration. For MCP, however, you must get the currency rates and pass an additional object mcp in your init requests. Please refer to the dedicated page Multi-currency pricing for more details.
Language support
To change the language of our payment forms, you can pass the parameter language during your init calls.
"language": "en"Our Redirect and Lightbox integration currently support the following languages:
English en | German de | French fr | Italian it |
Spanish es | Greek el | Norwegian no | Danish da |
Polish pl | Portuguese pt | Russian ru | Japanese ja |
Please get in touch should you need an additional language to be added for your checkout or if you find a translation error.
Styling the payment pages
Apply your corporate design to our payment pages with the object theme. Customize the header, the pay button, the logo, and more. The correct value for the parameter logoSrc is the name you specified for your uploaded svg file in our merchant administration portal.
"theme": {
	"configuration": {
		"brandColor": "#FFFFFF",	 // Base color [hex]
		"logoBorderColor": "#A1A1A1",	 // Border color around your logo [hex]
		"brandButton": "#A1A1A1",	 // Background color for the pay button [hex]
		"payButtonTextColor": "white",   // Color for the text on pay button [white|black]
		"logoSrc": "{{file.svg}}",       // File name of your logo
		"logoType": "circle",		 // Format of your logo on payment pages [hex]
		"initialView": "list",	         // Listing method of payment methods

		// Only required if no logo is used:
		"brandTitle": "false"		 // Hides the title from header
		"textColor": "black",		 // Color for the title [white|black]
	}
}
Complete example
Here's an init example including all options discussed on this page. Send only the required parameters to our API to make your life as a developer easier.
curl 'https://api.sandbox.datatrans.com/v1/transactions' \
-H 'Authorization: Basic {basicAuth}' \
-H 'Content-Type: application/json' \
-d '{
	"currency": "CHF",
	"refno": "Test-1234",
	"amount": 1000,
	"paymentMethods": ["VIS","ECA","PAP","TWI"],
	"autoSettle": true,
	"option": {
		"createAlias": true
	},
	"redirect": {
		"successUrl": "{successUrl}",
		"cancelUrl": "{cancelUrl}",
		"errorUrl": "{errorUrl}"
	},
	"theme": {
		"configuration": {
			"brandColor": "#FFFFFF",
			"logoBorderColor": "#A1A1A1",
			"brandButton": "#A1A1A1",
			"payButtonTextColor": "white",
			"logoSrc": "{{file.svg}}",
			"logoType": "circle",
			"initialView": "list",
		}
	}
}
Webhook
After any transaction that was processed via our Redirect or Lightbox integration, we will call your webhook with all relevant transaction information. You can define your webhook URL within your merchant configuration. You can choose among two options to call your webhook. In both cases, we only try to call your webhook once. If it fails, no additional calls will be performed.
- Synchronous: Customers are redirected to the success, error, or cancel URL only after your webhook returned a valid response or an error. This is the default behavior and the only option for transactions via the JSON API.
- Asynchronous (deprecated): Customers are redirected to the success, error or cancel URL regardless of what happens with our webhook call. This is still available for customers that use the Redirect / Lightbox flow via a deprecated integration.
Contact us if you require an asynchronous setupPlease contact us if you require an asynchronous setup of your merchant's webhook. This can only be changed by our support team.
{
  "transactionId" : "{transactionId}",
  "merchantId": "1100012345",
  "type" : "payment",
  "status" : "authorized",
  "currency" : "CHF",
  "refno" : "Test-1234",
  "paymentMethod" : "ECA",
  "detail" : {
    "authorize" : {
      "amount" : 1000,
      "acquirerAuthorizationCode" : "113009"
    }
  },
  "card" : {
    "alias" : "{cardAlias}",
    "masked" : "520000xxxxxx0007",
    "expiryMonth" : "12",
    "expiryYear" : "29",
    "info" : {
      "brand" : "MCI CREDIT",
      "type" : "credit",
      "usage" : "consumer",
      "country" : "MY",
      "issuer" : "DATATRANS"
    },
    "3D" : {
      "authenticationResponse" : "Y"
    }
  },
  "history" : [ {
    "action" : "init",
    "amount" : 1000,
    "source" : "api",
    "date" : "20XX-09-14T09:25:27Z",
    "success" : true,
    "ip" : "85.0.141.184"
  }, {
    "action" : "authorize",
    "amount" : 1000,
    "source" : "redirect",
    "date" : "20XX-09-14T09:25:26Z",
    "success" : true,
    "ip" : "85.0.141.184"
  } ]
}
SameSite cookies
From Chrome 80 onwards, cookies that do not specify a SameSite attribute will begin to be treated as if they were SameSite=Lax. Datatrans does not use cookies for payments. However, if your redirect URLs rely on an active user session in order to work properly, there is a possibility that the new cookie behavior in newer versions of Chrome will break your payment flow.
The SameSite=Lax behavior can be enforced with newer versions of Google Chrome for testing. Set chrome://flags/#same-site-by-default-cookies and chrome://flags/#cookies-without-same-site-must-be-secure to enabled. During testing, please make sure to wait 2 minutes before redirecting back to your page. This is needed because Chrome treats cookies without the SameSite attribute only as SameSite=Lax after 2 minutes. If your solution does not work anymore after enabling SameSite=Lax, please adjust your configuration by applying the recommended changes described by Google.
More information and how other browsers handle this topic can be found here.
Setting the ShortLaxAllowUnsafeThresholdIf during development you don't always want to wait two minutes for your tests, the following Chrome feature can be enabled to lower the timeout from 2 minutes to 10 seconds:
--enable-features=ShortLaxAllowUnsafeThresholdThis feature is available in Chrome 79.0.3945.16 and newer.
Updated 8 months ago