
Payment Button
Version 3 documentationThis documentation is referring to the Payment Button version 3.x
Version 3 introduces the following new features:
- support for static and dynamic MCP (Google Pay and Apple Pay)
- support for multiple payment buttons instances in the same page
Payment Button v2 has been deprecated and is no longer recommended for new integrations as new features will only be available on version 3.x.
While we recommend migrating to version 3, existing integrations remain supported and maintained. The v2 documentation is available here: Payment Button v2.
Payment Button is a JavaScript library from Datatrans that facilitates the setup, rendering, and usage of payment buttons of different Wallet providers. It also uses the Payment Request API specified by W3C. If the Payment Request API is unavailable, it returns to the corresponding vendor implementation. This library gives you a single integration for rendering payment buttons. It automatically detects which button should be displayed depending on the browser and device combination that is used.
  |   |   |   |
Domain whitelisting required for Apple PayYour domain needs to be whitelisted to allow the Payment Button to correctly do authorizations with Apple Pay. Please login to your merchant account and proceed with whitelisting your domains. The domain whitelist section for Apple Pay can be found in your merchant configuration within the section
Apple Pay Settings.
Process overview
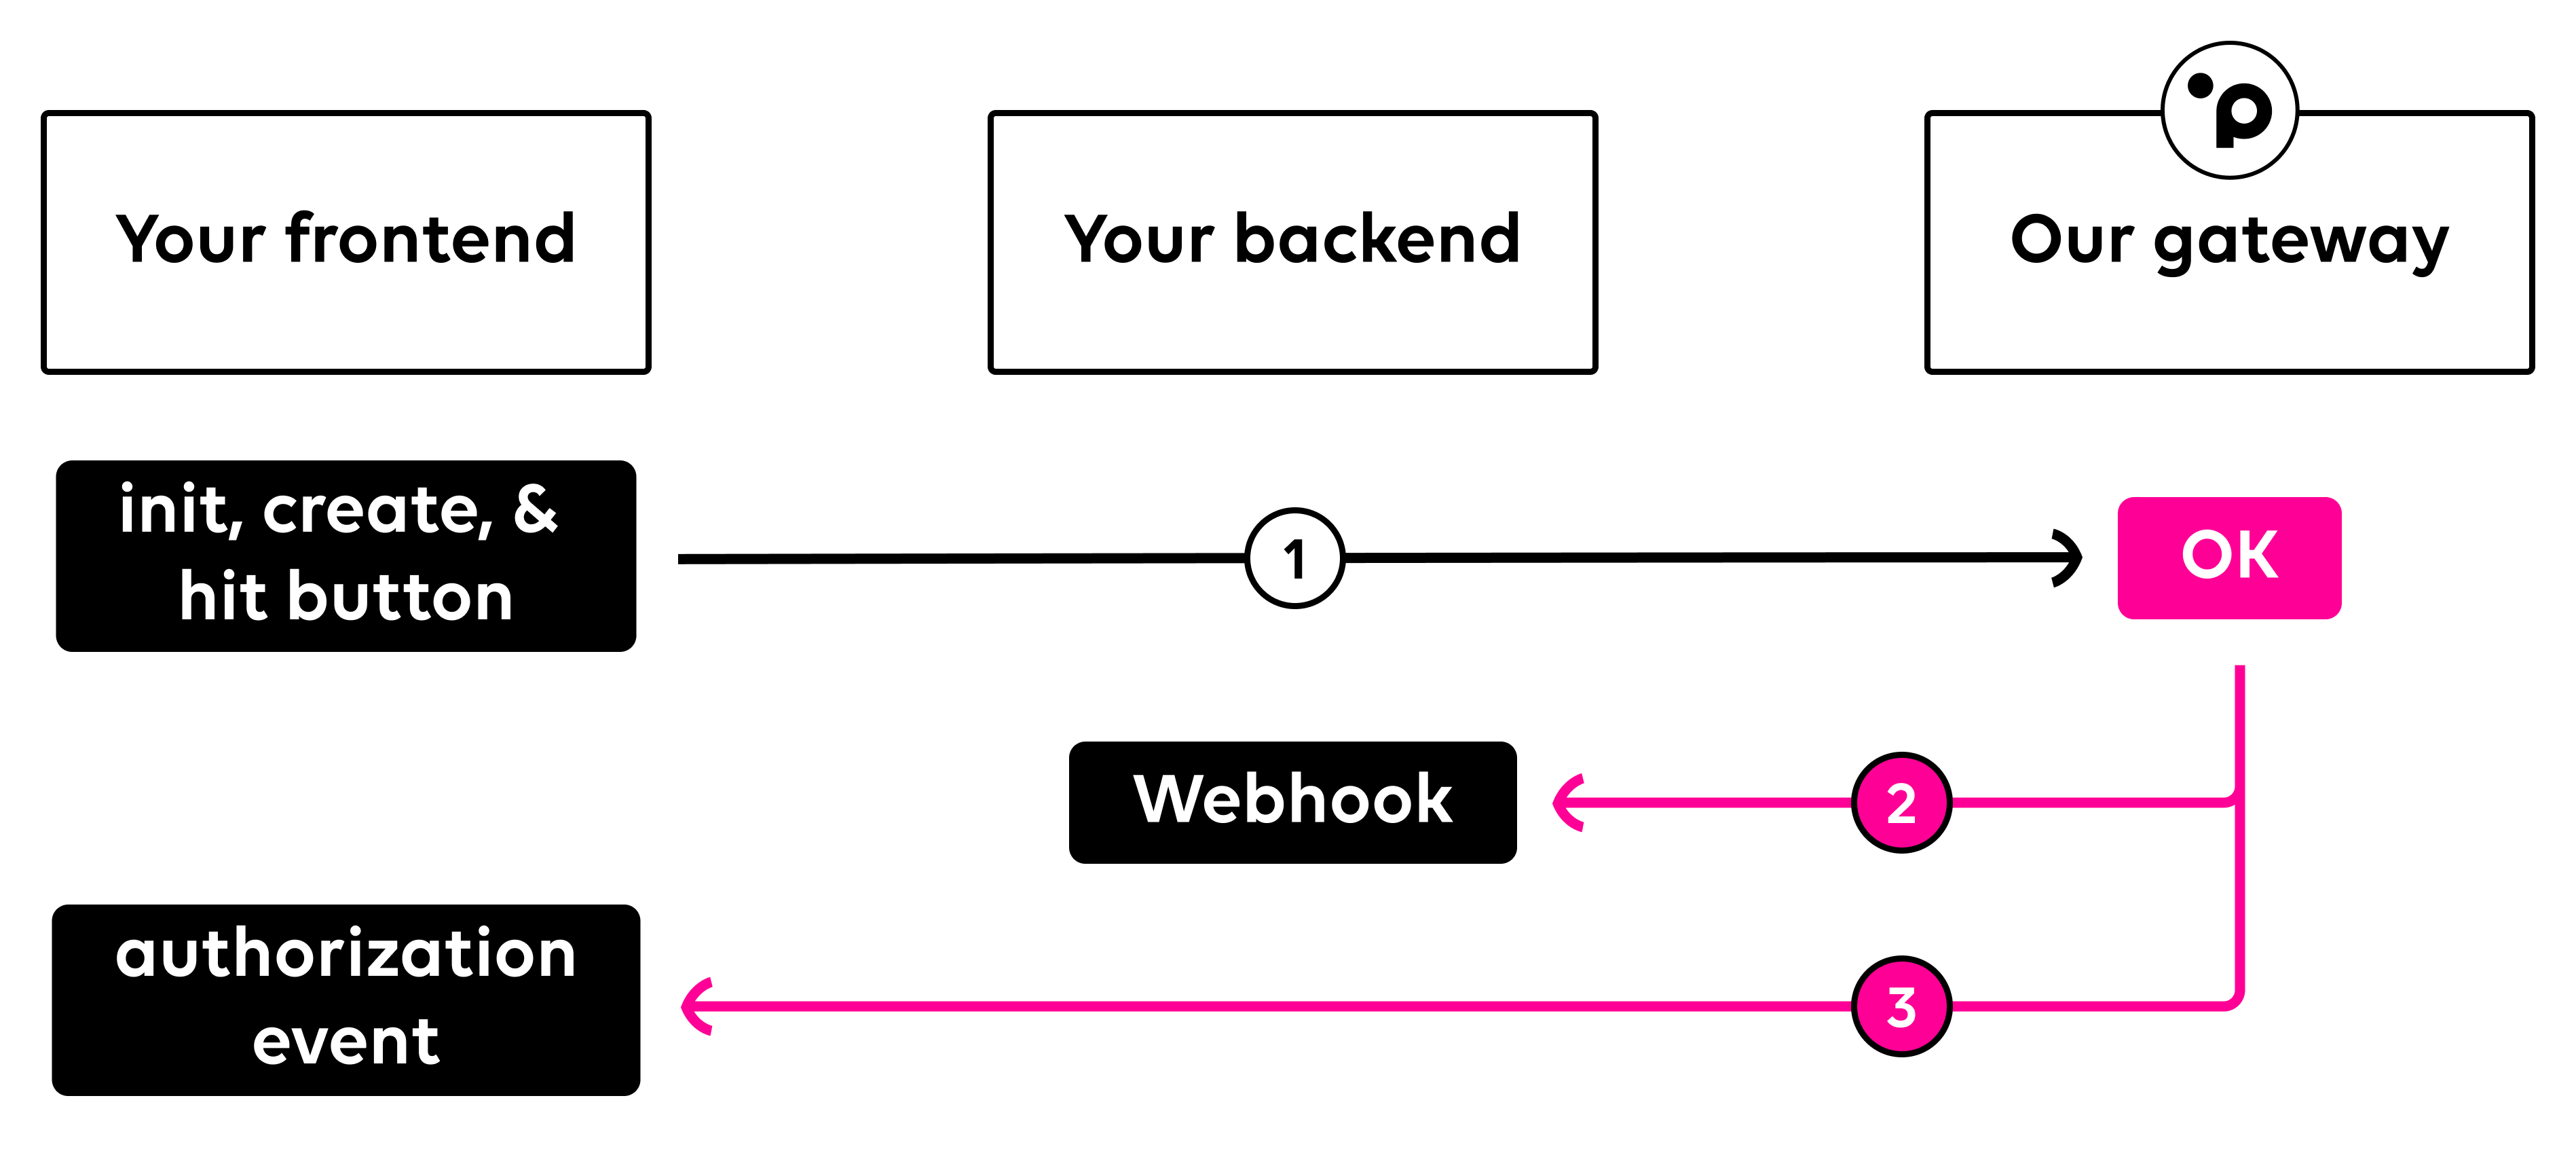
To start a transaction via our Payment Button Integration, you will need to initialize the Payment Button Javascript library and wait for your customer to hit the button provided by the library ¹. We will call your webhook once the transaction has been completed ² and inform your front end again once a transaction has been finalized ³.
Payment Button integration
To get started include our Payment Button script on your web page.
<script src="https://pay.sandbox.datatrans.com/upp/payment/js/payment-button-3.0.0.js"></script>Our Payment Button expects the object payment which conforms with the W3C payment request interface description. The object transaction contains Datatrans specific values, including countryCode and refno. Please refer to the section important parameters for more details on the expected values. In contrast to our other APIs, the amounts in the payment button integration are in the standard base unit of the currency. If you want to include fractional monetary units (pennies, cents, Rappen), you will have to separate the amount using a decimal point (eg. 5.10 instead of 510).
const payment = {
  // W3C
  details: {
    total: {
      label: "My Merchant",
      amount: { value: "10.50", currency: "EUR" },
    },
    displayItems: [
      {
        label: "Tax",
        amount: { value: "1.50", currency: "EUR" },
      }
    ],
    shippingOptions: [
      {
        id: "express",
        label: "Express Shipping",
        amount: { value: "5.00", currency: "EUR" },
      }
    ]
  },
  options: {
    requestPayerEmail: true,
    requestPayerName: true,
    requestPayerPhone: false,
    requestShipping: true
  },
  // Datatrans
  transaction: {
    countryCode: "CH",
    refno: "3e23dasdasd1123",
    mcp: {
      amount: { value: "10.03", currency: "CHF" },
      provider: "Planet",
      reasonIndicator: "MI",
      // Dynamic MCP (optional)
      conversionRate: "0.9552076392157822",
      transactionDate: "2026-01-01T12:00:00Z",
      retrievalReferenceNumber: "123456789000"
    }
  }
};
Next, create a payment button object for each button you want to display on your website.
const paymentButton = new PaymentButton();Placing & initializing the Payment Button
Place the button at your desired location.
paymentButton.on("init", function () {
  paymentButton.create(document.getElementById("paybutton"), payment);
});
Following, you’ll want to define your payment options. Within .init() you define the merchant configuration, the name visible on the payment sheet, the settlement option, the allowed card brands, and other options related to the wallets.
paymentButton.init({
  merchantId: "{merchantId}",
  merchantName: "Test",
  tokenOnly: false,
  autoSettle: false,
  allowedCardNetworks: ["AMEX", "DISCOVER", "MASTERCARD", "VISA"],
  googlePayConfiguration: {
    buttonType: "long",
    buttonStyle: "black",
    merchantId: "{googlePayMerchantId}",
  },
  applePayConfiguration: {
    buttonType: "plain",
    buttonStyle: "black",
  },
});
Success
Listen for the authorization event of the .on() call.
paymentButton.on("authorization", (data) => {
  console.log(data); // Output: { transactionId: "260612171018032113" }
});
Webhook
After any transaction that was processed via our Payment Button integration, we will call your webhook with all relevant transaction information. You can define your webhook URL within your merchant configuration. Any server to server request to modify an existing transaction has to be made with our transactionId. Please refer to our page After The Payment for more information on actions you can make after a payment has been completed.
Within our Payment Button integration, your webhook will always be called asynchronously after a transaction has been completed. We only try to call your webhook once. If it fails, no additional calls will be performed.
Showcase & more
For a detailed sample you can visit our Payment Button showcase. All events and parameters are explained there in detail too.
Updated 21 days ago