
Mobile SDK
Version 4 documentationYou’re viewing documentation for Mobile SDK version 4.x. To learn what’s new in Mobile SDK 4, see What’s new in Mobile SDK 4.
Version 4 introduces a new architecture and currently supports card payments, Apple Pay, Google Pay, PayPal, PostFinance Pay and Twint.
We are actively working toward full feature parity with version 3.x, with additional payment methods and features planned for upcoming releases.
For full feature coverage, refer to the version 3.x documentation .
Accept payments on your iOS or Android apps: Our mobile SDKs support your entire payment and registration process and simplify the integration of any payment method. Completely outsource your payment processes to us from inside your native apps. We also take care of redirecting your users to 3D Secure processes and enable smooth app switches to other payment applications including PayPal, Twint, and PostFinance Pay. Check the release notes and the integration link of our iOS and Android SDK below.


SDK integration:/v2/transactionsrequiredMobile SDK 4 works with transactions and attempts and requires the use of our transactions API version 2. See our migrations page if you are migrating from Mobile SDK 3.x and
/v1/transactions:
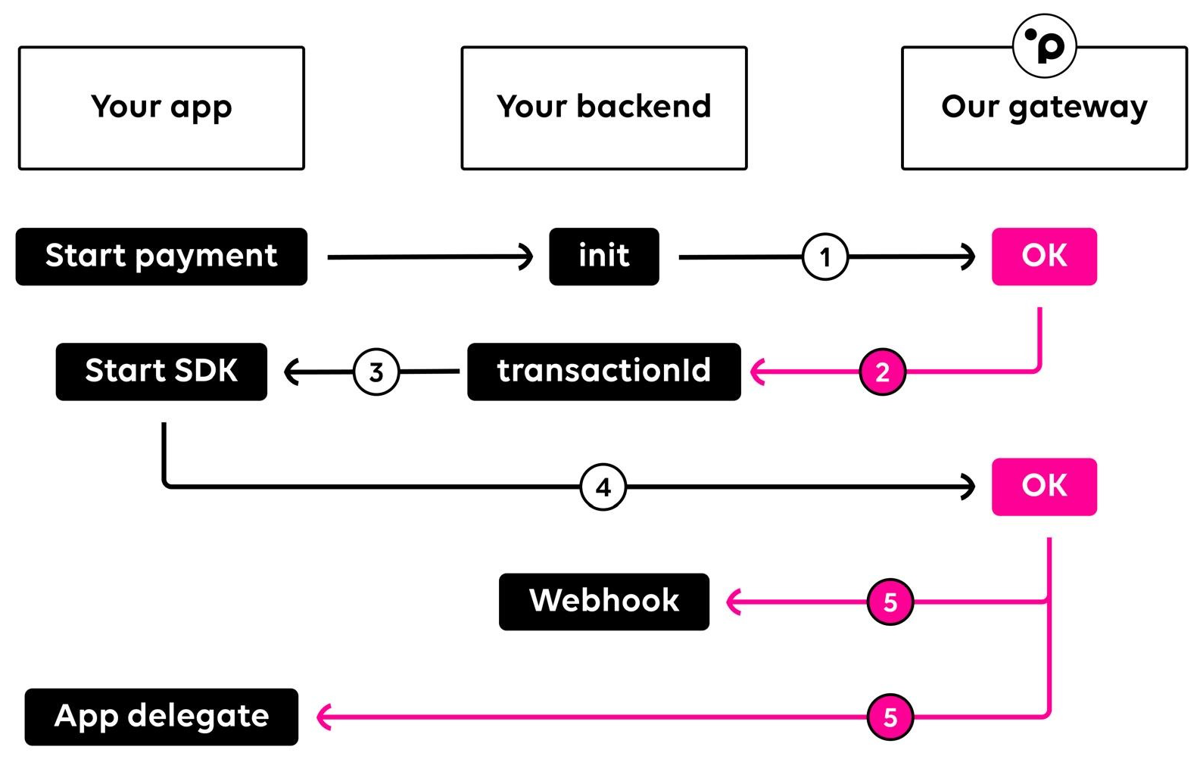
Process overview
To start a transaction via our SDK, you will need to call our init endpoint ¹ to receive a new transactionId ². The transactionId must be returned to your mobile application and can then be used to start the SDK ³. Once your customer completes the transaction ⁴ we will return the transaction information to your defined webhook and to the delegate ⁵ defined in your application
Initializing transactions
To create a payment with our Mobile SDK, first initialize the transaction with a server-to-server call to our init endpoint. The response returns a transactionId that your app can use to start the SDK flow. A transactionId remains valid for 30 minutes if it is not used, and you must request a new one for each SDK invocation. If you want to create a dedicated registration, omit the amount parameter. For details, see saving payment information .
Include at least one payment method in the init request to retrieve a transactionId.
- Send one value in
paymentMethodsto preselect a payment method and open its payment screen directly. - Send multiple values in
paymentMethodsto display several payment methods in the SDK. When multiple payment methods are available, including multiple cards, the SDK does not close after an error and instead lets the user try another method. - The order of values in
paymentMethodscontrols the order shown in the SDK.
Include customer, shipping, or billing information in the init payload when a payment method requires it. This is commonly needed for invoice payment methods.
curl 'https://api.sandbox.datatrans.com/v2/transactions' \
-H 'Authorization: Basic {basicAuth}' \
-H 'Content-Type: application/json' \
-d '{
	 "currency": "CHF",
	 "refno": "Test-1234",
	 "amount": 100,
	 "paymentMethods": ["ECA","VIS","PAP","TWI"]
}'
Now that you have retrieved a transactionId, you can continue with the initialization of our iOS or Android SDK.
SDK Integration
Continue with the platform-specific integration guide:
Auto settlements
Settle your transactions automatically or in two steps with the parameter autoSettle during your init calls. If you do not specify anything in your init request, your transactions will not be settled automatically. Please refer to the section settling a transaction for more information on deferred settlements and the related server-to-server request.
"autoSettle": trueSaving payment information
You can save card or payment method details after the customer completes a payment or registration. Some payment methods support registration during payment, while others require a dedicated registration flow. See the tokenization overview confirm which payment methods support each option. confirm which payment methods support each option. For the full flow, see saving payment information.
The saved payment method data is returned in the SDK, included in your webhook, and available later through checking the status of a transaction.
"amount": 1000,	// Omit for dedicated registrations
"option": {
   "createAlias": true	// Required to save payment details
}
The SDK returns saved payment data as a SavedPaymentMethod object. Use toJson to convert it to JSON.
Fast checkouts
You can use the SDK for fast checkout and one-click checkout flows.
- For card payments, include a
cardobject withalias,expiryMonth, andexpiryYearin the init payload. After the SDK starts, authentication and authorization are performed automatically. This flow is useful when you want a faster checkout while still supporting 3D Secure when required. - For other payment methods (e.g. Twint, PayPal, or PostFinance Pay), include the payment-method-specific object and its alias in the init payload, for example
TWIfor Twint.
Include only one payment method in the paymentMethods array for this flow.
"card": {
	 "alias": "{cardAlias}",
	 "expiryMonth": "12",
	 "expiryYear": "28"
},
"paymentMethods": ["VIS"]
"TWI": {
"alias": "{twintAlias}"
},
"paymentMethods": ["TWI"]You can achieve the same behavior by passing a SavedPaymentMethod object, or one of its subclasses such as SavedCard, to the SDK together with the transactionId.
Saved payment method selection
Unlike our Redirect and Lightbox integration, you can call our SDK with multiple previously saved payment methods (aliases). You can even include multiple aliases per card brand (for example two Visa aliases). This enables users to finalize their payment with a single click by selecting from a list of saved payment methods. To do this, start the SDK with a list of SavedPaymentMethod or its subclasses (e.g. SavedCard).
Mandatory 3DS data
3DS (3-D Secure) authentication requires additional consumer data. Your init requests must include valid consumer data, including the cardholder's name and email or phone number. For more information, see the 3DS mandatory data overview.
{
   ...
   "card": {
      "3D": {
         "cardholder" : {
            "cardholderName": "John Doe",
            "email": "[email protected]",
            "homePhone": {
            "cc": "41",
            "subscriber": "791234567"
         }
      }
   }
}
Currency conversion
The Mobile SDK integration supports dynamic currency conversion (DCC) and multi-currency pricing (MCP) of our Currency Conversion offering.
For DCC, you do not need to make any integration changes; it will be a simple change by us in your merchant configuration. After DCC is enabled for your merchantId, use savedCardDCCShowMode in TransactionOptions to enable DCC (default), disable DCC, or smartly enable DCC for transactions with saved cards (tokens). Smart DCC reduces how often the DCC flow is shown when a consumer has previously declined it multiple times.
For MCP, you must get the currency rates and pass an additional object mcp in your init requests. Please refer to the dedicated page Multi-currency pricing for more details.
Language support
Set the language parameter in the init request to change the SDK user interface language.
"language": "en"The SDK automatically uses the device language if no language is passed in the init request.
Our iOS and Android Mobile SDKs currently support the following languages:
English en | Danish da | Dutch nl | Finnish fi |
French fr | German de | Italian it | Norwegian no |
Portuguese pt | Spanish es | Swedish sv |
Please contact us if you need an additional checkout language or notice a translation issue.
Webhook
After a transaction is processed with the Mobile SDK, we send your webhook the relevant transaction information. You can define the webhook URL in your merchant configuration or send it in the init request.
For SDK transactions, we call your webhook synchronously after the transaction flow ends successfully. After your webhook responds, the SDK continues and returns the transaction state to your app.
We attempt the webhook in all flows:
- payments
- dedicated registrations
- authentication-only flows
We notify about all outcomes, including:
- success
- error
- user cancellation
- timeouts where the SDK is not invoked or the payment is abandoned
Note: We call your webhook only once. If it fails, no additional calls will be performed.
{
   "transactionId" : "{transactionId}",
   "merchantId": "1100012345",
   "type" : "payment",
   "status" : "authorized",
   "currency" : "CHF",
   "refno" : "Test-1234",
   "paymentMethod" : "ECA",
   "authorizedAmount" : 1000,
   "card" : {
      "alias" : "{cardAlias}",
      "masked" : "520000xxxxxx0007",
      "expiryMonth" : "12",
      "expiryYear" : "29",
      "info" : {
         "brand" : "MCI CREDIT",
         "type" : "credit",
         "usage" : "consumer",
         "country" : "MY",
         "issuer" : "DATATRANS"
      },
      "3D" : {
         "authenticationResponse" : "Y"
      }
   },
   "attempts" : [ {
      "attemptId" : "{attemptId}",
      "type" : "payment",
      "amount" : 1000,
      "acquirerAuthorizationCode" : "160600",
      "status" : "authorized",
      "paymentMethod" : "VIS"
   } ]
}